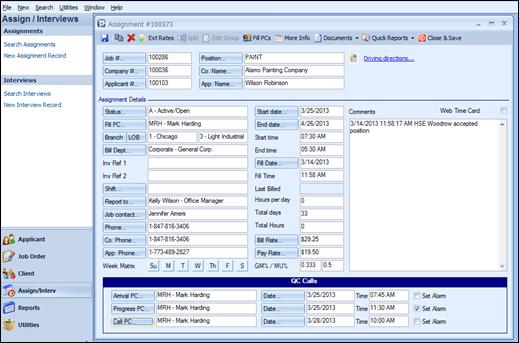
Temp Job Assignment form
Job #: The job order number that pertains to the assignment. Click the field label for ease of code selection via list view.
Position: The position that the assignment is filling.
Company #: The company number that pertains to the assignment. Click the field label for ease of code selection via list view.
Co Name: The name of the company that the assignment is at. Click the field label for ease of code selection via list view. Do not use if there are a lot of records in the database. Have the job order activated before you add the assignment to avoid this search.
Applicant #: The applicant number that pertains to the assignment. Click the field label for ease of code selection via list view.
App Name: The name of the applicant assigned. Click the field label for ease of code selection via list view. Do not use if there are a lot of records in the database. Have the job order activated before you add the assignment to avoid this search.
Driving directions: This feature enables the use of MapQuest to provide driving directions for your applicant either to or from the place of employment and their home. The webpage will provide both text directions and a map. In addition, the map can be printed or emailed to the applicant from the File pull-down menu of the web browser.
Status: The job order status. Click the field label for ease of code selection via list view. Applicable status codes are: A – Active/Open; C – Complete; CA – Cancel Applicant; CC – Cancel Client; CI – Client Interview; CN – Conversion; CP – Cancel Poor Performance; D – Delete; F – Fall-Off; N – No-Start; PN – Pending; R – Resume Sent to Client; RS – Refused Assignment.
Fill PC: The PC that filled the order. Click the field label for ease of code selection via list view.
Branch: The Branch code of the client. This will default from the Job Order, but can be changed if needed. An example of this would be if the Job Order was entered by one Branch location and another Branch filled it with their employee. When the Branch is changed on the Assignment record, all payroll costs/revenues for this employee will be assigned to that Branch.
LOB: The Line of Business that this Assignment falls under. This is defaulted from the Job Order, but can be changed if needed.
Bill Dept: The department that should be billed for this assignment. This will default from the job order, but can be changed here if necessary. This appears on certain invoice type formats.
Inv Ref 1 / Inv Ref 2: These are Invoice Reference fields – both will display on the invoice for additional comments about this employee. An example of use would be if a client assigns a badge number to each employee and they need to see this badge number on the invoice. This will appear on certain invoice type formats.
Shift: The shift for this assignment. This will default from the job order, but can be changed here if necessary.
Report To: The person that the temp should report to for the assignment. The field label is available for ease of code selection via list view. This will appear on certain invoice type formats.
Job Contact: The Client contact for this assignment. The field label is available for ease of code selection via list view.
Phone #: The phone number for the contact.
Co. Phone: The client’s phone number. The field label is an action button which is used for automatic dialing from the workstation. The workstation must be set up for auto dial in order to utilize this feature.
Appl. Phone: The phone number of the applicant.
Week Matrix: The days of the week the assignment is for. The days will default from the job order, but can be changed here if needed.
Start Date: The date the assignment starts. A calendar is available by clicking the field label, or a date can be keyed into the field directly. A date must be entered in one of the following formats: MMDDYY or MM/DD/YY.
End Date: The date the assignment ends. A calendar is available by clicking the field label, or a date can be keyed into the field directly. A date must be entered in one of the following formats: MMDDYY or MM/DD/YY.
Start Time: The time the assignment is to start each day. Input times in military format. It will reformat in non-military for your convenience.
End Time: The time the assignment is to end each day. Input times in military format. It will reformat in non-military for your convenience.
Fill Date: The date the assignment was filled. A calendar is available by clicking the field label, or a date can be keyed into the field directly. A date must be entered in one of the following formats: MMDDYY or MM/DD/YY.
Fill Time: The time the assignment was filled. Input times in military format. It will reformat in non-military for your convenience.
Last Billed: This field is automatically updated by the system through Ultra-Staff Back Office Time Capture. This will display the last time this employee’s assignment was Accepted into the Pay/Bill process.
Hours per day: The number of hours per day for the assignment.
Total Days: The total number of days of the assignment.
Total Hours: The total number of hours. This is automatically calculated by multiplying the hours per day by the total days, but can be overridden.
Bill Rate: The rate that the client will be billed for this assignment. This field fills in from the first Bill Range field on the job order. If a different bill rate is desired, it can be manually changed, if needed. Clicking the field label will activate the Profit Analyzer add-on Module. See the section in this manual for details regarding the use and setup of this program.
Pay Rate: The pay rate for the applicant for the assignment. This pay rate will default from the first Pay Range field on the job order, but can be manually changed, if needed. Clicking the field label will activate the Profit Analyzer add-on Module. See the section in this manual for details regarding the use and setup of this program.
GM%: The gross margin percentage (% of the sale that is profit) . It is automatically calculated by the system. The calculation is (BILL RATE - PAY RATE)/BILL RATE.
MU%: The markup percentage (% of cost that is profit). It is automatically calculated by the system. The calculation is (BILL RATE - PAY RATE)/PAY RATE.
Comments: Comments pertain to any information that is applicable to the assignment, such as the temp arrived on time; they are doing well on the assignment, etc. This is a free-form field. Using the right-mouse click in this field will insert the system date, time, and user PC code.
Arrival PC: The PC that will be checking on the temp’s arrival. Click the field label for a list view of PC Codes. The PC code can also be keyed in, if preferred.
Date: This is the date of the arrival check call. It is automatically set to the start date of the assignment if you click in the date field. A calendar is available by clicking the field label, or a date can be keyed into the field directly. A date must be entered in one of the following formats: MMDDYY or MM/DD/YY.
Time: Time of the arrival check call. It is automatically set to 15 minutes after the start time if you click in the time field, but it can be overwritten. Input times in military time. It will reformat in non-military for your convenience.
Set Alarm: Click this checkbox if the Reminder Alarm in the daily planner is to be enabled for this follow up event.
Progress PC: The PC who will be responsible for the progress call. Click the field label for a list view of PC Codes. The PC code can also be keyed in, if preferred.
Date: The date of the progress call. It is automatically set to the start date of the assignment if you click in the date field. A calendar is available by clicking the field label, or a date can be keyed into the field directly. A date must be entered in one of the following formats: MMDDYY or MM/DD/YY.
Time: The time of the progress call. It is automatically set to 4 hours after the start time if you click in the time field. Input times in military. It will reformat in non-military for your convenience.
Set Alarm: Click this checkbox if the Reminder Alarm in the daily planner is to be enabled for this follow up event.
Call PC: The PC who will be following up on the status of the assignment. Click the field label for a list view of PC Codes. The PC code can also be keyed in, if preferred.
Date: The date of the status call. A calendar is available by clicking the browse button in the date field, or a date can be keyed into the field directly. A date must be entered in one of the following formats: MMDDYY or MM/DD/YY.
Time: The time of the progress call. Input times in military. It will reformat in non-military for your convenience.
Set Alarm: Click this checkbox if the Reminder Alarm in the daily planner is to be enabled for this follow up event.