This is used to view or record employment history information.
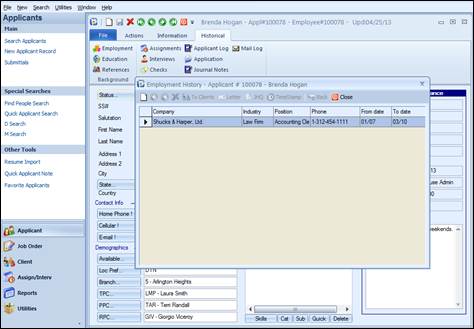
A list of employment history records with the columns: Company, Industry, Position, Phone, Start Date, and End Date are displayed. History listed can be called up by double clicking on the desired company name. To add a new historical employment record from the history list screen, select New. To close and save, click Close & Save. All other options are inactive on the list screen. When the individual history form is opened, all commands will become active.
Employment History listing
|
1 |
The number of former employers that can be input into an Applicant’s Employment History is unlimited. The Employment History form offers multiple places for data, with categorized options available in the Job History Questionnaire. See the following pages for a detailed explanation.
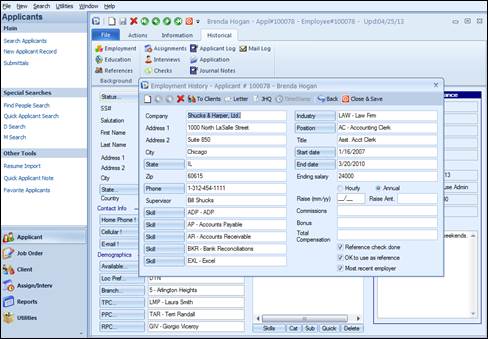
Employment History screen from Applicant record
Company: Company where the applicant was or is currently employed. A company name auto-fill has been incorporated which will check the database to see if that company already exists in the Ultra-Staff Client table. If it does, the full company name, address, city, state, zip, phone number, and industry are automatically filled into the screen. This will save on data entry time and improve accuracy.
Address1: The first line of address for the company.
Address2: The second line of address for the company.
City: The city in which the company is located.
State: The state where the company is located. Click the field label for ease of code selection via list view, if desired.
Zip: The zip code or postal code where the company is located. This field allows for up to nine digits.
Phone: The company’s phone number. It can be keyed in with area code and phone digits, and the system will automatically format it. If you prefer, you can type in the phone number with formatting. The field label is an action button used for automatic dialing from the workstation. Your workstation must be set up for auto dial in order to utilize this feature.
Supervisor: The supervisor the applicant worked for at the company.
Skill: There are 5 skill fields which are used to select the skills that were most used on the job at the company listed. Click on the field label for ease of code selection via list view.
Highlight up to 5 skills in the list view on the first Skill field, and the 5 skill fields will automatically fill in. Or, select a skill from each skill field.
The skills are selected in the same fashion as on the
applicant screen. These skills are searchable by using the  button found next to the SKILLS parameter
on the Applicant Search screen.
button found next to the SKILLS parameter
on the Applicant Search screen.
Industry: The industry the company works in.
Position: The position the applicant held at the company. Click the field label for ease of code selection via list view. These are the position codes set up in Codes Editor.
Title: This is a free form field for the actual title the applicant held when employed by the company.
Start Date: The date the applicant started work at the company. Clicking the field label will access a calendar for date selection.
End Date: The date the applicant ended work at the company. Clicking the field label will access a calendar for date selection.
Ending Salary: The final salary the applicant received while at this company. Two bullets appear under this field, one for Hourly wages and the other for Annual. Choose the appropriate category for salary.
Raise (MM/YY): The date of the last raise received. It is to be input in month/year format.
Commissions: The amount of commissions paid while employed at the company.
Bonus: The amount of bonus paid while employed at the company.
Ref Check Done: Check this box if a reference check was done.
Ok to Use as Ref: Check this box if the company can be used as a reference.
Most Recent Employer: Check this box if this is the most recent employment. The most recent company name will display on the applicant search grid if company name is selected to display on the search results grid.
Options on Top of Employment History Screen:
New: Adds a new Employment History record.
Prev: Retrieves the previous Employment History record from the list.
Next: Retrieves the next Employment History record from the list.
Delete: Removes an Employment History record.
To Clients: This tool allows for the “one touch” addition of a new client form into Ultra-Staff from this employment history. It will pre-fill in basic information such as company name, address, skills and industry.
Letter: This launches the Letter Writer program. From here, you are able to create a document which contains fields specific to the Employment History screen. Refer to the section in this manual on the Letter Writer program for details on how to use it.
JHQ: Accesses the Job History Questionnaire. It contains several categories of notes. To enter or view notes for a particular category, click the category and the cursor will be positioned in the Comments area of the form to enter notes:

Job History Questionnaire accessed from the Employment History screen
The JHQ (Job History Questionnaire) contains 12 text fields: Comments, Reference Check Notes, Reason for Leaving, Resume Notes, Major Responsibilities, Special Accomplishments, Computer Skills, Systems Utilized, Position/Company Likes, Position/Company Dislikes, Strengths and Weaknesses. These notes are categorized so that you can easily reference a specific type of information regarding the applicant’s employment with each company, and the labels for each of these can be customized through Codes Editor.
To record notes, or view notes under a specific category, highlight the category on the left, and type and/or view notes on the right side. These notes are an unlimited, free form field. Time Stamp will become active once in the JHQ, and can be used to enter the Date/Time/Login information.
Back: Returns the screen to the previous screen.
Close & Save: Exits the Employment History list and saves any new or changed information. You may also close by clicking “X” in the upper right corner of the Employment screen.