 button found in the Pay Range and Bill
Range fields from within the Temporary Job Order form, or click on the Pay Rate
and Bill Rate field labels found in the Assignment window.
button found in the Pay Range and Bill
Range fields from within the Temporary Job Order form, or click on the Pay Rate
and Bill Rate field labels found in the Assignment window. The Profit Analyzer Module is an optional, add-on module that allows the playing of ‘what if’ with bill rates, margins, and pay rates. This feature offers each consultant the opportunity to analyze the net effect of all pricing decisions. With its customizable formula sheet, the Profit Analyzer Module can be an accurate reflection of an actual rate/burden situation, thus allowing your firm to set pricing guidelines for your consultants. Once new pay and bill rates are selected, choosing the SEND button will take these rates and populate the appropriate fields within Ultra-Staff.
The Profit Analyzer Module is completely customizable, to fit any organization’s needs. The Tax Burden Rate can be customized, and then used as a default for the organization. The details on how to do this will be discussed later in this documentation.
To access the Profit Analyzer Module, simply click on the button found in the Pay Range and Bill
Range fields from within the Temporary Job Order form, or click on the Pay Rate
and Bill Rate field labels found in the Assignment window.
![]()
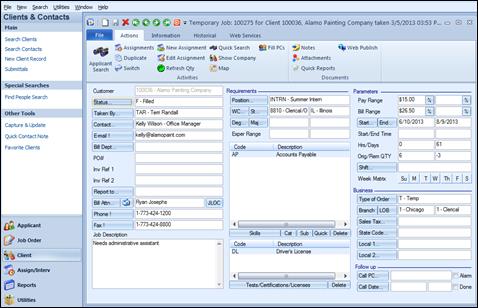
Access the Gross Profit Analyzer from the Job Order by clicking the ‘%’ sign next to the Pay or Bill Range fields.
![]()
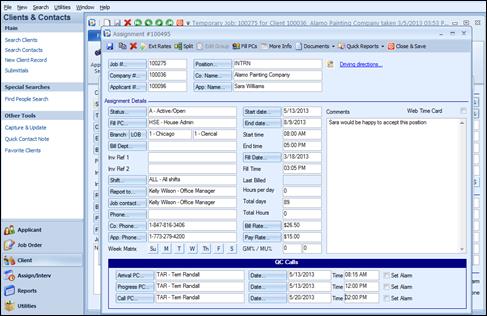
Access the Gross Profit Analyzer from an Assignment by clicking the Bill or Pay Rate field labels.
The Profit Analyzer Module is also available in the Client Bill Rates, and can be accessed by clicking on the GM Calculator button found at the bottom of the Client Bill Rates window.
![]()
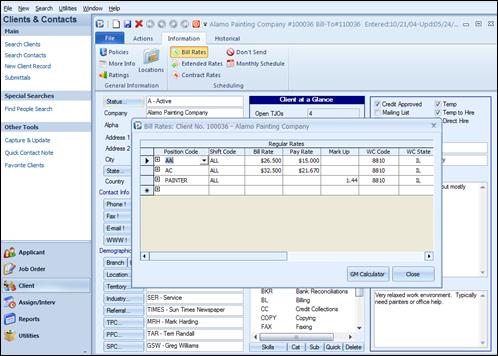
Access the Gross Profit Analyzer from the Client Bill Rates by clicking on the GM Calculator button.
Once the Profit Analyzer Module is accessed, the following window will be displayed:
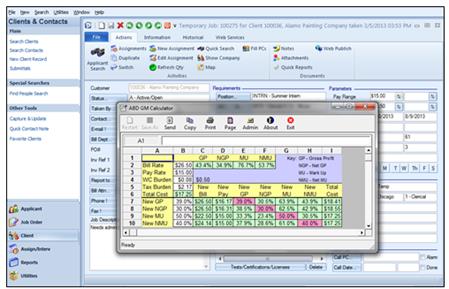
Gross Profit Analyzer worksheet.
The Bill Rate and Pay Rate will default from the Job Order or Assignment, and the calculations are as follows:
GP = (Bill Rate – Pay Rate) / Bill Rate
NGP = (Bill Rate – Pay Rate – WC Burden –Tax Burden) / Bill Rate
MU = (Bill Rate – Pay Rate) / Pay Rate
NMU = (Bill Rate – Total Cost) / Total Cost
The WC Burden will also be calculated – it takes the Workers Compensation Code / State (which has the rate attached) from the Job Order, and calculates the burden as follows:
WC Burden: (Pay Rate x WC Rate) / 100
Notice that the table is split – the top portion displays the current information, as seen on the Assignment Record and/or Temporary Job Order, and the bottom portion displays the New Gross Profit / Mark Up information. Use the lower portion to manipulate the Gross Profit (GP) and Mark Up (MU) percentages to see the effects it will have on the Bill and Pay Rates, as well as allowing these amounts to fit within the company’s goals.
Because this program is completely customizable, changes can be made to the calculations, fields, as well as colors and columns. To do this, users must be logged in as ADMIN, and select the Admin button. The following window will be displayed:
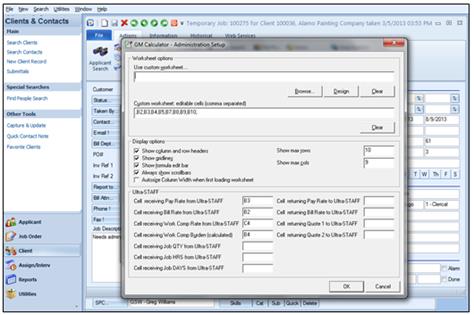
Gross Profit Analyzer Administration setup.
The options, in detail from the top of the Admin screen, are as follows:
Worksheet options:
Use custom worksheet….Since the Profit Analyzer Module is completely customizable, there is a Browse option which allows users to find and import their own calculations spreadsheet, if desired. Selecting Browse will display a window such as this:
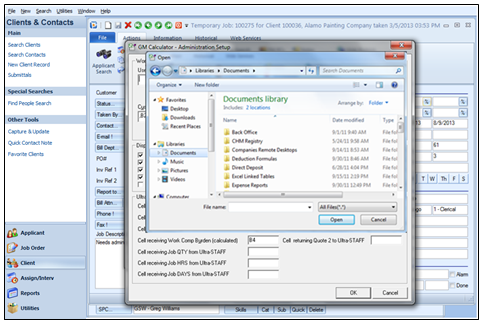
Browsing to a previously saved custom worksheet
Find and select the worksheet to be used and once selected, you will be returned to the Worksheet options window. If using a custom worksheet and it is to be shared throughout the network, keep in mind that a UNC name must be used (i.e., \\servername\directory\spreadsheet.xls), instead of using a drive letter.
If opting to use the worksheet provided with the program, select the Design button, instead of Browse, to make any changes to the calculations or to aesthetics. Choosing this button will open the VCI Formula One Workbook Designer. This is where changes to any field may be made.
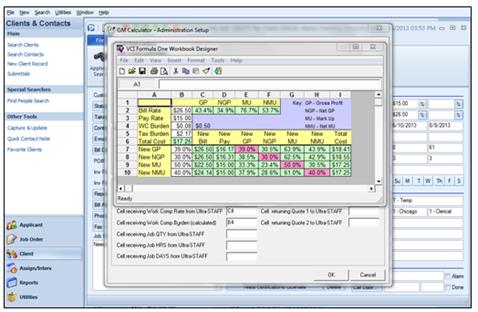
Access the default Gross Profit Analyzer worksheet by selecting Design
Whatever field is selected (in this example, cell D7 New Pay is selected), at the top of the window the cell is displayed (D7) as well as the title or calculation (depending on the cell selected). Make the necessary changes and close using the ‘X’ when done.
Notice that cell A5 in our example is the Tax Burden. By selecting and populating this field the Tax Burden is set as a default for all end-users. The Work Comp Burden is calculated based on the Workers Comp Rate that is entered for the Position code selected.
Please note that the changes made here will ultimately affect the end-user access.
The Clear button is used to remove the contents of the Use custom worksheet… field.