


![]()
Applicant Payroll Record
The Payroll Record toolbar icons are described below:
Save: Use this button to save changes to the Billing Information screen.
Print: Use this button to print the employee’s profile.
E-mail: Use this button to send an e-mail to the employee.
Bank Info: Use the Bank Info button to view/edit the employee’s direct deposit and Debit Card information. The following information pertains to the employee if using the Direct Deposit add-on module.
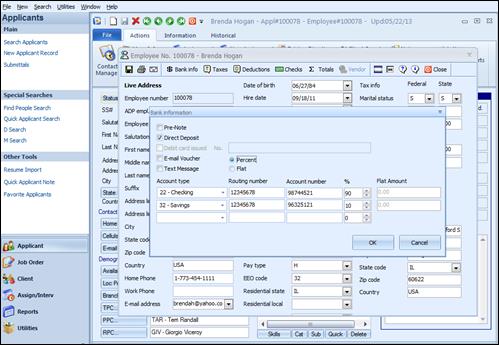
Bank Info screen for Direct Deposit
Pre-Note: Check this box if the applicant is in the pre-note phase of direct deposit. An applicant will stay checked as a pre-note until the bank notifies you that the applicant account information is verified. To clear this checkbox, click on it to remove the checkmark.
Direct Deposit: Check this box when the applicant has been approved by the bank to be in the direct deposit program. Checking this box, will un-check the Pre-Note box. To clear this checkbox, click on it to remove the checkmark.
Debit Card Issued: This option is used if the Debit Card module has been purchased. Check this box if the applicant has received a debit card.
No: Enter the number of the debit card that has been issued to the applicant.
E-mail Voucher: Click this checkbox if the direct deposit voucher is to be automatically emailed to the applicant, instead of printed out during the Ultra-Staff Back Office payroll process.
Text Message: Click this checkbox if the applicant is to receive a text message informing them of their direct deposit information after the Ultra-Staff Back Office payroll process.
Account Number: This is the bank account number for the account that goes to direct deposit.
Routing Number: This is the bank routing number to be used for direct deposit.
%: This is the percentage of dollars that are to go into the selected account. Only percentage amounts can be used; not fixed dollar amounts. The amount totaled for all lines has to equal 100% or the record will not be saved.
Taxes: Used to select the tax jurisdictions to which the applicant is subject. These will default from the Applicant Payroll record however they can be modified at any time. Note that changing any of these entries will affect the payroll taxes for this Applicant.
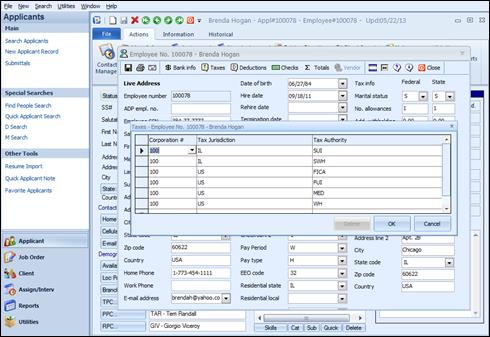
Applicant Tax screen
Corporation #: Identifies the corporation that the tax pertains to. If an applicant can work in multiple corporations (separate Federal ID’s), then a line for each corporation/Tax Authority/Tax Jurisdiction will need to be entered.
Tax Jurisdiction: The tax jurisdiction that the tax pertains to. This could be a local, state or Federal jurisdiction.
Tax Authority: This code represents the specific tax. For example, SWH represents state withholding, MED is the Federal Medicare, etc.
Deductions: Use the Deductions button to view/edit the employee’s deduction information.
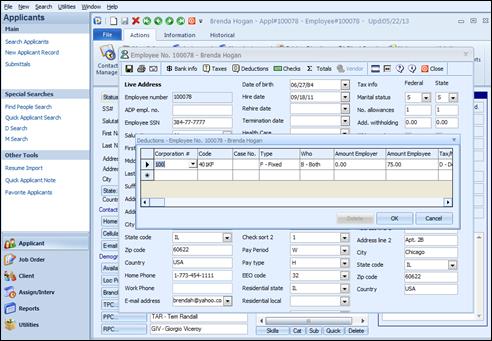
Applicant Deduction screen
Corporation: the Corporation that the deduction code is a part of.
Code: The Deduction code for the employee deduction.
Case No.: Enter the case number associated with the deduction. In the Ultra-Staff Back Office, the Deduction Register report will display this case number.
Type: The type refers to whether the deductions are F-Fixed; P-Percent; N-Net Of; C-Calculated / Formula and X-Use Max % of Net Check. This field will automatically populate once the Deduction Code is selected.
Who: This field represents whether the employer, employee or both are responsible for the deduction.
Amount Employer: The amount of the deduction that the employer is responsible for. This field can be used alone or in the formula field in conjunction with other calculation variables. This numeric value will correspond to the deduction type, i.e. if ‘10’ is entered and the deduction type is P-Percent, Ultra-Staff recognizes that the numeric value is a percentage. Alternatively, if the deduction type is F-Fixed and ‘10’ is entered, Ultra-Staff recognizes that this represents a dollar amount.
Amount Employee: The amount of the deduction that the employee is responsible for. This field can be used alone or in the formula field in conjunction with other calculation variables. . This numeric value will correspond to the deduction type, i.e. if ‘10’ is entered and the deduction type is P-Percent, Ultra-Staff recognizes that the numeric value is a percentage. Alternatively, if the deduction type is F-Fixed and ’10 is entered, Ultra-Staff recognizes that this represents a dollar amount.
Tax/No Tax: Options are T-Taxable or D-Deferred.
Formula: Check this box if a formula will be used to calculate the deduction. If the Deduction Code selected is a Formula-based deduction, this box will automatically be checked.
Use Formula: If the Deduction Code selected requires a formula, the correct value will be defaulted here, depending on the details of the deduction. The options are: F-Use Formula Field or EFEMF-Employer Formula/Employee Formula.
Formula: If the Deduction Code selected requires a formula, the formula will default here. This field is used when the ‘Use Formula’ is an “F”, and this formula will be needed to calculate the deduction.
Formula Employer: If the Deduction Code selected requires a formula, the formula will default here. This field is used when the ‘Use Formula’ is an “EFEMF”, and this formula will be needed to calculate the deduction for the employer portion.
Formula Employee: If the Deduction Code selected requires a formula, the formula will default here. This field is used when the ‘Use Formula’ is an “EFEMF”, and this formula will be needed to calculate the deduction for the employee portion.
Frequency: Enter the deduction frequency code that applies to the deduction. This code indicates which week of the month the deduction should be taken. 0=All weeks, 1=Week 1, 2=Week 2, etc. These codes are defined in the Ultra-Staff Back Office.
Per Check Limit: This amount represents the limit that the deduction cannot exceed per paycheck. The deduction amount cannot exceed this amount on any given paycheck.
Limit: This is the deduction limit that the deduction cannot exceed.
Authority Vendor: The vendor code to whom the deduction is to be paid. In cases such as a garnishment, the vendor information entered here can be used when running the Deduction Register report from the Ultra-Staff Back Office, so the deduction amounts can be grouped by Vendor so that a report can be sent with the vendor check.
Max % Net: The maximum percentage (%) that the deduction can be for a given paycheck. This is for type X deductions only.
Priority: The priority for this deduction. Typically, a child support deduction would be a priority 1, a United Way deduction a priority 2, etc. If no priority is specified here, it will become a priority 99 in the system.
Stop Deduction: Check this box if the deduction has been satisfied, or the deduction should not be taken any longer. This allows for the deduction information to remain on the applicant record, without worrying that it will continue to be taken.
Annual Deduction Flag: This checkbox is not accessible from this form. This is a flag that is set with the properties of the deduction in the Ultra-Staff Back Office. This is used in situations where a deduction is to be taken each calendar year up to a specified limit amount; once the limit is met for this calendar year, nothing more will be taken until next year.
Checks: Use the Checks button to display the payroll checks that have been issued to the employee.
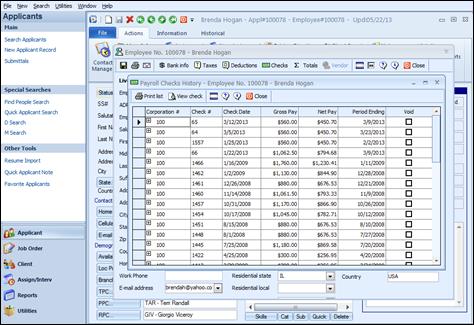
Applicant Check History
The options within the Check History screen are as follows:
To display voided checks, check the “Show Voided Checks” checkbox at the bottom of the screen.
To view the check details, click the [+] icon to the left of the check number.
To print the listing of checks, click the Print button at the bottom of the window.
To view a check, highlight the line and click the View button at the bottom of the window.
Click the Close button at the bottom of the window to close this window
Totals: Use the Totals button to view the Employee’s payroll totals for Year-to-date, Quarter-to-date, Month-to-date, Pay Period or Check.
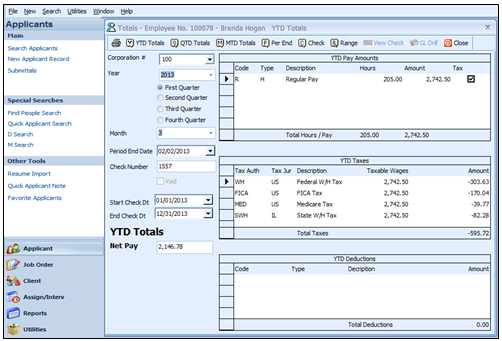
Applicant wage totals
To view Year-to-date totals, enter the year to be viewed on the left side of the screen. Click the YTD Totals button at the top of the screen.
To view Quarter-to-date totals, enter the year and the quarter to be viewed on the left side of the screen. Click the QTD Totals button at the top of the screen.
To view Month-to-date totals, enter the year and month to be viewed on the left side of the screen. Click the MTD Totals button at the top of the screen.
To view Period totals, enter the end date of the period to be viewed on the left side of the screen. Click the Per End button at the top of the screen.
To view Check totals, enter the check number to be viewed on the left side of the screen. Click the Check button at the top of the screen. When viewing a check’s total, the View Check button at the top of the screen becomes active. Users can view a copy of the check using this button. The GL Drill button at the top also becomes active when viewing a check’s total. Users can view the specific GL information from this transaction.
Change Toolbar Alignment: Click this button to toggle toolbar alignment, (top or bottom)
Fields Administration: The Admin user will be able to select this to lock fields and require fields to be filled out. This is discussed in the Administrators Guide.
Help: Click this button to display the help screen.
Version Info: Click this button to display version and copyright information for the Billing Information screen.
Close: Use this button to close the Billing Information screen.